Wednesday, October 26, 2011

Tortellini Sausage Soup
3 links Italian sausage
4 cloves pressed garlic
1 onion, diced
½ c. water
2 15-oz. cans chicken broth
½ c. apple cider (don’t leave this out! I did once and it wasn’t the same…)
1 16-oz. can diced tomatoes
1 8 oz. can tomato sauce
1 c. sliced carrots
1 tsp. dried basil
1 tsp. dried oregano
2 medium zucchini, grated (great way to use your food processor if you have one)
8-10 oz. package cheese tortellini (check the freezer section of your grocery store; if you can find it there, it will almost always be way cheaper than fresh tortellini. Also, Barilla makes a great dry cheese tortellini)
2 Tbsp. dried parsley (yes, that’s two tablespoons)

If you’re using link sausage, remove the casings and crumble into a large soup pot. To remove the casings, you can use a sharp knife to cut a slit down one side of the sausage and then peel back the casing. And just so you know, both Sara and I have tried taking pictures of this method and there is no G-rated way of posting those pictures…
Begin cooking sausage over medium heat, stirring frequently. If your sausage is pretty fatty, you’ll want to drain it when it’s about halfway cooked. Meanwhile, chop onions and garlic
and add to the sausage. Continue cooking until onions are translucent and your sausage is cooked. Your house will smell heavenly.
Add tomatoes, tomato sauce, juice, water, chicken broth, carrots, oregano, and basil. Cover and simmer for 1/2 hour. Add parsley and zucchini
and simmer for another 15 minutes or so.
Add the tortellini
and cook until tender, and then serve with bread and freshly-grated Parmesan.
Note: If you’re making breadsticks, start the dough first, then prepare the first “phase” of the soup while the dough is rising. While the soup is simmering, twist the breadsticks, let them rise, and they’ll be done baking about the same time the soup is done.

Monday, October 10, 2011

Island Spice Pork Tenderloin

Most of the time when I save recipes, I do it because I know without a doubt that we will love the result. (This is why about 98% of the recipes I have saved are desserts.) Sometimes, though, I save things more because I think, “Hmmm…interesting…that might be good.” This recipe was definitely a case of the latter. In fact, I put it on our menu back in November or December but the day came when I was planning to make it and it just did not sound good to me at all. So back into the freezer went the pork, and it has been there all this time waiting for me to change my mind. I finally decided that I needed to either use the pork or get rid of it, so I put the recipe back on the menu and decided I would make it no matter what. Turns out, we were blown away by this meal.

The combination of spices may seem a bit odd, but the end result is a little bit spicy but also sweet, and incredibly flavorful. Ben even deemed this his new favorite kind of pork tenderloin. I was very surprised by how quickly it came together. Most pork tenderloin recipes I make require marinating of some length, but this is just a simple spice rub made from pantry ingredients, and a glaze to go on top. I halved the amount of glaze because the original amount just seemed like overkill. I’m glad I did because this was just the right amount. Just be sure to spread the glaze out very evenly over the top of the tenderloins. I had a bite or two that seemed overly sweet because of too much glaze. All in all, this is a fantastic preparation of pork that is quick enough for a weeknight and nice enough to serve to company.

Island Spice Pork Tenderloin
Printer-Friendly Version

Ingredients:
For the spice rub:
2 tsp. kosher salt
½ tsp. ground black pepper
1 tsp. ground cumin
1 tsp. chili powder
1 tsp. ground cinnamon

2 pork tenderloins (about 2-2½ lbs. total)
2 tbsp. olive oil

For the glaze:
½ cup packed dark brown sugar
1 tbsp. (2-3 cloves) finely minced garlic
1½ tsp. Tabasco sauce

Directions:
Preheat the oven to 350˚ F. Combine the salt, pepper, cumin, chili powder and cinnamon in a small bowl. Stir together with a fork to blend. Pat the mixture over the pork tenderloins.

Heat the olive oil in an ovenproof 12-inch skillet over medium-high heat. Place the tenderloins in the skillet and brown on all sides, turning occasionally, about 4 minutes total. Remove from the heat, leaving the pork in the skillet.

Stir together the brown sugar, garlic and Tabasco in a small bowl until blended. Spread the mixture evenly over the tops of the tenderloins.

Place the skillet in the preheated oven and roast about 20 minutes, until an instant-read themometer inserted in the center of each tenderloin registers 140˚ F. Loosely tent the skillet with foil and let stand 10 minutes before slicing and serving.

Source: adapted from Pennies on a Platter, originally from The Gourmet Cookbook

2426share2


Saturday, September 17, 2011

Apple Streusel Bars

SWEET PASTRY:
2 c. flour
1/2 c. sugar
1/2 tsp. baking powder
1/2 tsp. salt
1 c. real butter, softened (no substitutions!)
1 egg, beaten
APPLE FILLING:
1/2 c. white sugar
1/4 c. flour
1 tsp. cinnamon
4 c. (about 3 medium) sliced, peeled baking apples (I’ve used Granny Smith in the past, although this time around I used Gala and they were fabulous)
GLAZE:
2 c. powdered sugar
About 3 Tbsp. milk (whole milk is best)
1 tsp. almond extract
To prepare crust, mix flour, sugar, salt, and baking powder in a medium bowl. Cut in butter with a pastry blender or two knives until you have pea-sized crumbles. Gently mix in beaten egg.
Spray a 9×13 baking dish with non-stick cooking spray. Gently pat about 2/3 of the crumb mixture onto the bottom of the dish. Preheat oven to 350 and set aside.

To prepare apple filling, combine flour, sugar, and cinnamon and toss with apples.


Spread apples out on prepared crust. Sprinkle reserved crust mixture over apples evenly and bake in preheated oven for 40 minutes.


When finished, allow to cool completely.

To prepare glaze, whisk together powdered sugar, almond extract, and enough milk to achieve desired consistency.


Place glaze in a Ziploc bag and cut off a very small portion of one of the corners. (Or just use a fork(Drizzle glaze over cooled pastry and allow to harden (you can place it in the freezer to hurry things along). Cut into bars and serve.


In an attempt to keep yourself from eating the whole pan, you, like me, will probably have to send half of them to a nice home…

So for all you moms out there, what do you want for Mother’s Day? All you hubbies, dads, and kids (grown-up kids…I’m pretty sure we don’t have any kid-kids reading our blog!), what are you doing for your moms?

-Courtesy of Our Best Bites

Thursday, September 1, 2011

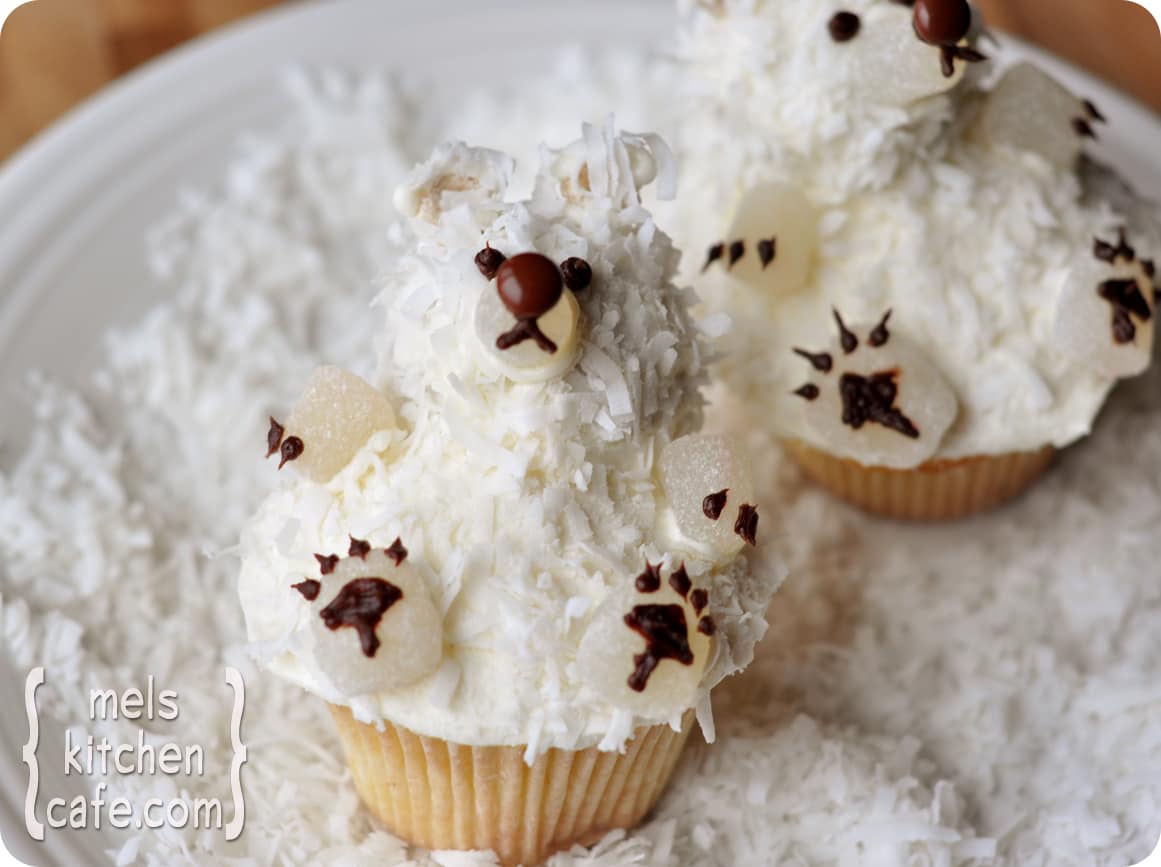
Polar Bear Cupcake

There’s nothing worse than eyeballing an adorable cupcake that looks too good to eat….stuffing it in your face….and realizing that actually, it really was too pretty to eat and should have been left alone. If there’s one thing I hate doing, it is sacrificing taste for appearance. So imagine my joy to be able to share with you the only vanilla cupcake recipe I’ve been making for the last year. It is so moist, so delicious, and so perfect in any application. Frosted up cute like these polar bears and snowmen cupcakes or simply garnished with frosting and a few sprinkles – either way, the cupcake is beautiful and gloriously tasty. These cupcakes are the best and are my go-to cupcakes (for non-chocolate purposes, of course).

Snowman Cupcake

In addition, I wanted to share a quick and easy buttercream frosting that I use all the time. Yes, I love this magical frosting, but the vanilla buttercream recipe, below, makes an equally frequent appearance because not only is it simple, it has a divinely creamy, silky texture that beats out all other easy buttercream frostings. I use this recipe on my kids’ birthday cakes and on most cupcakes I make, especially if I am going to pipe any decorations. It’s fantastic.

Incidentally, both of the cupcakes pictured above are from the brilliant Hello, Cupcake series. Those books make me look like a cupcake-decorating rockstar.

One Year Ago: Tortellini Spinach Salad with Balsamic-Tomato Vinaigrette
Two Years Ago: Quick and Delicious Clam Chowder
Three Years Ago: California Chicken Marinade

Vanilla Buttermilk Cupcakes
Printable Version with Picture
Printable Version

*Makes between 16-24 cupcakes

1 1/2 cups all-purpose flour
1 1/4 teaspoon baking powder
1/4 teaspoon baking soda
1/4 teaspoon salt
1 1/2 sticks (12 tablespoons) butter, softened to room temperature
1 cup granulated white sugar
2 large eggs
1 large egg yolk
2 teaspoons pure vanilla extract
1/2 cup buttermilk

Preheat oven to 350 for light, aluminum or silicone muffin pans or 325 for dark, nonstick muffin pans. Line about 16-24 muffin cups with liners and set aside.

In a medium bowl, whisk together dry ingredients. In a large bowl, beat butter and sugar until fluffy, about 2 minutes, scraping down the bowl as needed. Mix in eggs and egg yolk one at a time and then mix in the vanilla. Add 1/3 of the flour mixture to the wet ingredients. Combine. Add 1/4 cup of the buttermilk. Mix. Add another 1/3 of the dry ingredients. Mix. Add the final 1/4 cup of the buttermilk. Mix and then add the final 1/3 of the dry ingredients. Mix until combined and the batter is smooth. Spoon out batter into lined cupcake pan, filling only halfway or just barely over halfway.

Bake for about 15-18 minutes (depending on the heat of your oven based on the type of muffin pan you have), until a toothpick inserted into the middle of a cupcake comes out with moist crumbs. Don’t overbake!

Remove the cupcakes to a wire rack to cool completely. Frost as desired!

Recipe Source: adapted from Becca H., a reader, who got it from a Parade magazine

Quick Vanilla Buttercream Frosting
Printable Version

*Note: you can substitute milk for the heavy cream but the frosting will be missing an element of silky creaminess.

*Makes about 4 cups of frosting

½ cup (1 stick, 8 tablespoons) butter, softened to room temperature
3 ounces cream cheese, softened to room temperature
16 ounces powdered sugar (about 3 ½ cups)
¼ cup heavy cream
1 teaspoon pure vanilla extract

In a large bowl using a handheld mixer or the bowl of an electric stand mixer, beat the softened butter and cream cheese together until it is light and creamy, about 2 minutes. Mix in the vanilla. Add the powdered sugar gradually and mix in fully after each addition. Cream at low speed until well blended and creamy. Pour in the heavy cream and whip until the frosting is light and fluffy.

Recipe Source: adapted from The Recipe Girl

Thursday, July 14, 2011

Carrot Cupcakes/Muffins

Zoe Francois' Carrot Cupcakes
Often carrot cake can seem like a throw back to the ’70s, when they were dense and tasted ultimately too good for you. This updated version is moist, sweet and has a rich combination of spices that makes it one of the tastiest cakes ever. Adding a bit of orange and lemon zest to the smooth cream cheese icing brings out those bright flavors in the cake. I have served these cupcakes at every occasion, from picnics to weddings; it is even a terrific breakfast treat.
Carrot Cupcakes
Makes 24 cupcakes
Prep Time: 30 minutes
Baking Time: 30 minutes
Level: Easy

Ingredients
For the cake:
1 pound carrots, peeled
1/2 cup crushed pineapple, drained of excess juice
4 large eggs
1 1/2 cups sugar
2/3 cup brown sugar
1 cup oil
2 teaspoons vanilla extract
Zest of 1 orange
2 1/4 cups all-purpose flour
1 1/2 teaspoons baking powder
1 teaspoon baking soda
3/4 teaspoon salt
1 teaspoon ground cinnamon
1/2 teaspoon ground ginger
1/4 teaspoon ground nutmeg
1/4 teaspoon ground cloves
1 1/4 cups ground walnuts, lightly toasted (or shredded coconut)
1 cup raisins (or chopped dried cherries)
For the cream cheese frosting:
12 ounces cream cheese, softened
6 ounces (12 tablespoons) unsalted butter, softened
3 cups confectioners’ sugar
Pinch salt
1 teaspoon vanilla extract
1 teaspoon lemon zest
1 teaspoon orange zest
  • Preheat oven to 350 degrees. Prepare muffin tins with papers.
To mix the carrot cake:
  • Grate the carrots using the grater attachment on a food processor.
  • Grated and Chopped Carrots
  • Then chopped them into smaller pieces with the medal blade attachment in the food processor, so the texture of the cake will be finer.
  • Measuring Pineapple
  • Before measuring the pineapple, press it through a strainer to get rid of the excess juice.
  • In a large bowl, whisk together the eggs, sugar, brown sugar, oil, vanilla extract, and orange zest.
  • In a separate bowl, mix together the flour, baking powder, baking soda, salt, and spices with a whisk. Add the dry ingredients to the egg mixture. Add the finely chopped carrots, pineapple, walnuts, and raisins.
  • Fill Muffin Tins
  • Fill the muffin cups about 2/3 full. Bake for about 24 minutes or until a tester comes out clean. Allow the cupcakes to cool on a rack.
Frosting Cupcakes
To make the cream cheese frosting:
  • Cream together the cream cheese and butter in a stand mixer, fitted with the paddle attachment, on medium speed. Turn down the speed and add the sugar. Once the sugar is incorporated add the salt, vanilla and zest.
  • Use a pastry bag fitted with a large star tip to decorate the cupcakes with the frosting.
Recipe from by Zoë François at thecookingchanneltv.com